

You scroll past a pair of icy, shimmering nails and stop. You want that frosty look. Then you wonder if snowflakes will look cute or childish on your own hands. That worry is common. Snowflake designs feel tricky until you know the right base and the right line weight. These frosted snowflake winter nails solve it. You get 10 designs, from sheer and minimal to sparkly and bold. Each one comes with a clear formula, a pro tip and a trick to make it last. Some suit short, natural nails. Some need a salon. One takes fifteen minutes at home. Pick a favorite. Screenshot it. Show your nail tech or grab your gel kit.
What Actually Makes Frosted Snowflake Winter Nails Work
Four basics keep snowflake nails crisp instead of messy. Start with prep. Push back your cuticles, buff the shine and wipe with a dehydrator. Gel grips better on clean nails. Choose the right base. Sheer milky shades look soft. Navy and cranberry make white snowflakes pop. Draw thin lines. A fine liner brush gives sharp arms. Thick lines blur into blobs. Seal everything. A gel top coat locks in the frost and blocks chips. Cap the free edge every time.
1. Milky White Micro Snowflakes on Short Nails
“I want a snowflake look that still feels quiet.”
The Formula:
- Base: sheer milky white gel, two thin coats
- Design: one tiny white snowflake on each ring finger
- Technique: hand-paint with a fine liner brush and white gel
- Finish: glossy gel top coat
- Tools: nail prep kit, LED lamp, dotting tool
- Check Price on Amazon
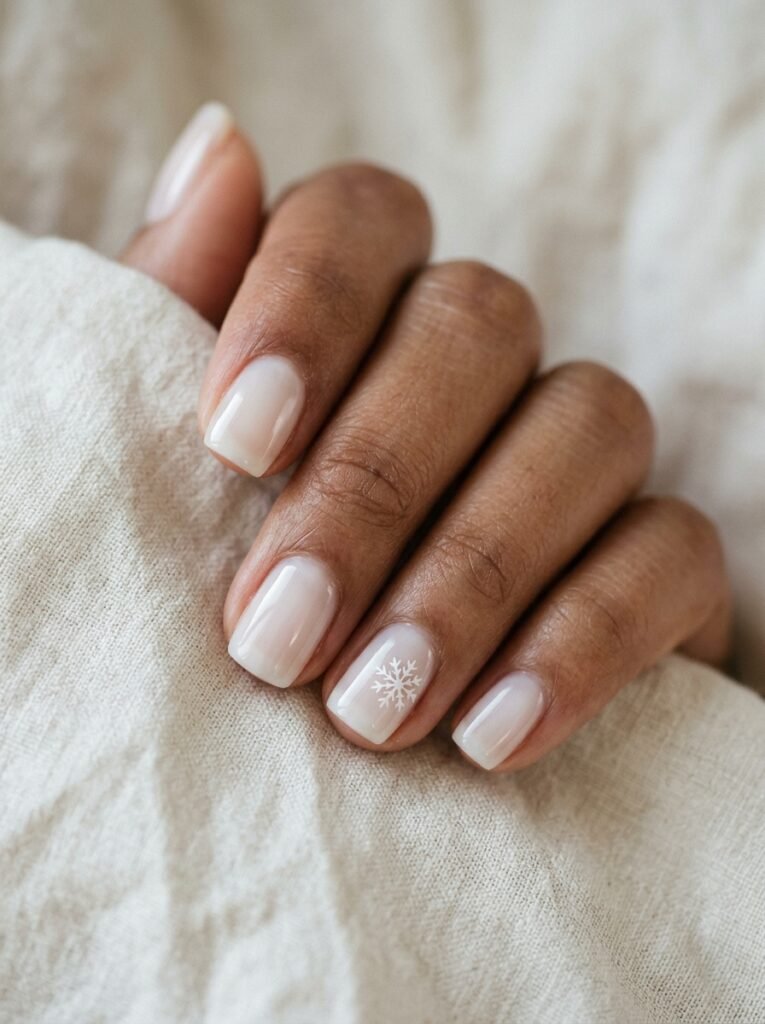
Why It Works: A sheer base looks clean on short, natural nails. One small accent keeps the frost subtle. Milky white flatters every skin tone.
Pro Tip: Draw the center cross first. Then add the short side lines.
Best For: Short natural nails in a squoval shape. Perfect for office days and holiday work parties.
Make It Last: Rub cuticle oil in daily. Cap the free edge when you apply top coat.
2. Icy Chrome Frosted Snowflakes on Almond Nails
“I want frost that actually sparkles.”
The Formula:
- Base: pale gray-white gel, cured
- Chrome: silver-blue chrome powder rubbed over a no-wipe top coat
- Design: white gel snowflakes on two accent nails
- Finish: second glossy top coat
- Tools: silicone applicator, fine liner brush
- Check Price on Amazon

Why It Works: Chrome reflects light like fresh ice. A pale base keeps the shine cool instead of harsh. White snowflakes stay sharp on top.
Pro Tip: Cure a thin top coat over the chrome before you paint. The gel then glides smoothly.
Best For: Medium almond nails. Great for New Year’s Eve and holiday parties.
Make It Last: Wear gloves when you scrape car windows or wash dishes.
3. Negative Space Snowflakes on Clear Gel Nails
“I love minimal nails with one pretty detail.”
The Formula:
- Base: clear gel or sheer nude
- Design: fine white snowflake linework on two or three nails
- Technique: negative space, with most of the nail left bare
- Finish: glossy gel top coat
- Tools: thin liner brush, dotting tool
- Check Price on Amazon
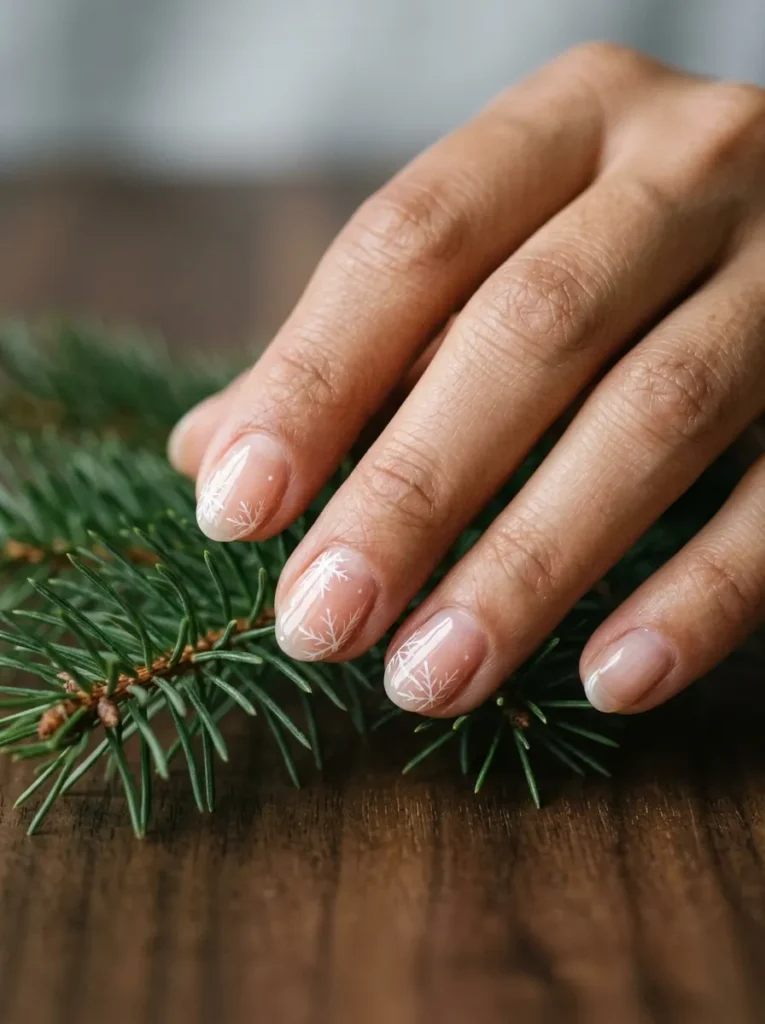
Why It Works: Bare nail shows through, so the frost feels light. Fine lines look delicate and modern.
Pro Tip: Sketch a tiny plus sign first. Then add two diagonal lines for six arms.
Best For: Short to medium oval nails. Ideal for brunch dates and grown-out natural nails.
Make It Last: Refresh dull edges with a thin layer of top coat.
💡 Quick Pro Tip: Wipe your liner brush on a lint-free pad after each snowflake. A clean brush keeps your lines thin. Thin lines make snowflake nails look polished.
4. Midnight Navy with White Snowflake Linework
“I want drama that still feels wintry.”
I paint snowflakes on clients every December. The thinnest lines always get the most compliments.
The Formula:
- Base: deep navy cream gel, two coats
- Design: white snowflakes in three sizes with tiny dot stars
- Technique: hand-paint with a liner brush
- Finish: glassy gel top coat
- Tools: liner brush, dotting tool
- Check Price on Amazon
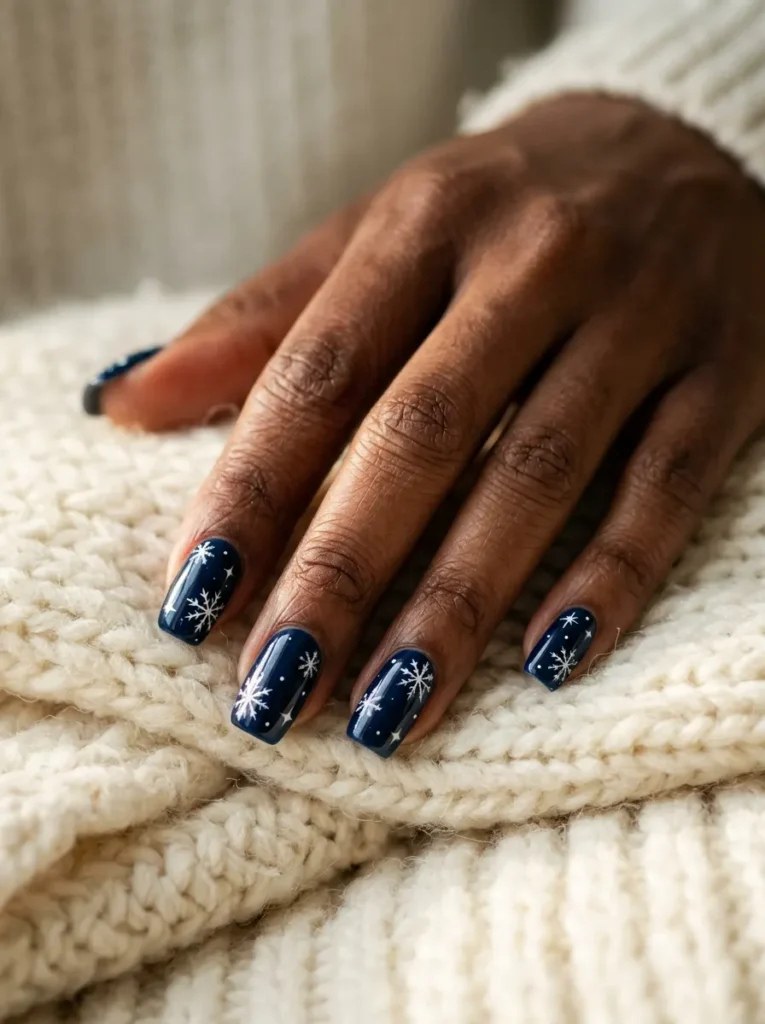
Why It Works: High contrast makes white lines glow like snow at night. Different sizes add depth.
Pro Tip: Flash cure each snowflake for ten seconds. Your lines stay crisp while you paint the next.
Best For: Medium squared nails. Navy glows on deep skin tones. Wear it to winter dinners.
Make It Last: Cap the tips and seal with top coat. Add cuticle oil nightly.
5. Frosted Glitter Ombré with a Silver Snowflake
“I want sparkle with a soft fade.”
The Formula:
- Base: sheer pale blue-white gel
- Glitter: fine silver glitter fading from the tips to mid-nail
- Design: one rhinestone snowflake on the ring finger
- Technique: makeup sponge ombré
- Tools: sponge, nail glue, tweezers
- Check Price on Amazon

Why It Works: The fade builds shimmer without covering the whole nail. Silver echoes frost on a window.
Pro Tip: Press the sponge with a rocking motion. Rolling spreads glitter evenly.
Best For: Medium to long coffin or almond nails. Made for holiday parties.
Make It Last: Seal glitter with two thin top coats so edges feel smooth.
⚠️ Common Mistake: Drawing thick snowflake arms with too much gel. They blur and look like blobs. The fix: load a tiny amount on the brush tip and pull each line in one smooth stroke.
6. Glazed Donut Frost with a 3D Snowflake Charm
“I want the glazed look with winter flair.”
The Formula:
- Base: sheer pink-white gel
- Glaze: pearl chrome powder rubbed over the base
- Design: one raised silver snowflake charm on the ring finger
- Technique: set the charm with builder gel
- Tools: tweezers, silicone applicator
- Check Price on Amazon

Why It Works: Pearl chrome gives a soft, frosty glow. The charm adds height, so the nail catches light from every angle.
Pro Tip: Add the charm last. Press it into a drop of builder gel and cure for sixty seconds.
Best For: Medium almond or oval nails. Lovely for winter weddings.
Make It Last: Pull knit sleeves away from the charm. Gentle habits prevent snags.
7. Icy Blue Aura Nails with Tiny Snowflakes
“I want a dreamy, frosty gradient.”
The Formula:
- Base: milky white gel
- Aura: icy blue gel airbrushed or sponged into a soft circle
- Design: tiny white snowflakes floating around the glow
- Finish: glossy gel top coat
- Tools: aura sponge or airbrush, liner brush
- Check Price on Amazon

Why It Works: The soft blue glow looks like frost spreading across glass. Tiny snowflakes keep the design crisp.
Pro Tip: Keep the aura away from the sidewalls. Clean edges look salon-fresh.
Best For: Short to medium nails in any shape. Fits winter dates and weekend brunch.
Make It Last: Use a gel top coat and apply cuticle oil daily.
“Winter does not have to look muted. Frost is allowed to sparkle.”
8. Silver Micro French Tips with Snowflake Accents
“I want something polished that still says winter.”
The Formula:
- Base: sheer nude or soft pink gel
- Tips: thin silver chrome micro French lines
- Design: one tiny white snowflake on the ring finger
- Finish: glossy gel top coat
- Tools: striper brush, chrome powder
- Check Price on Amazon

Why It Works: Thin French lines lengthen the nail bed. Silver chrome carries the frost theme without extra fuss.
Pro Tip: Rest your painting hand on the table. Drag the brush toward you for a steadier line.
Best For: Short to medium square nails. A smart pick for office days and winter weddings.
Make It Last: Cap the free edge and keep your nails moisturized.
9. Cranberry Red with Frosted White Snowflakes
“I need a holiday party manicure that photographs well.”
The Formula:
- Base: deep cranberry cream gel, two coats
- Design: white snowflakes on every nail
- Frost: sheer white shimmer gel tapped over the tips
- Finish: glossy gel top coat
- Tools: liner brush, flat brush
- Check Price on Amazon
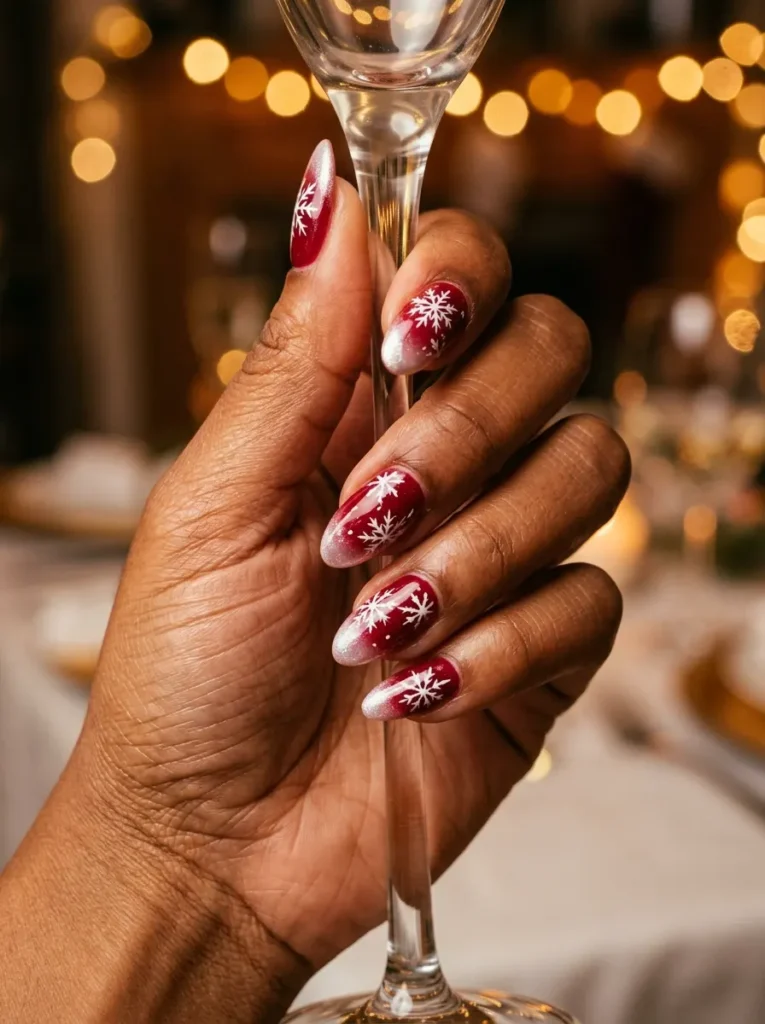
Why It Works: Red and white feel festive and rich. Frosted tips look like snow on berries.
Pro Tip: Tap the shimmer gel on with a flat brush. Dragging leaves streaks.
Best For: Medium almond or coffin nails. Great for Christmas parties and tree-lighting nights.
Make It Last: Book a fill at two weeks if your nails grow fast.
🧴 Shortcut: No liner brush? Dip the end of a bobby pin into white polish. Draw a plus sign, add a diagonal cross, then dot the center. Seal with clear top coat.
10. Beginner Snowflake Nail Stamping in Icy Blue and White
“My hands are not steady, but I want snowflakes.”
The Formula:
- Base: icy blue polish, two coats, fully dry
- Design: snowflake stamping plate with white stamping polish
- Technique: scrape, stamp, then press onto the nail
- Finish: quick-dry top coat
- Tools: stamping plate, stamper, scraper
- Check Price on Amazon

Why It Works: A plate gives sharp snowflakes in seconds. You skip freehand drawing. The image stays crisp on dry polish.
Pro Tip: Work fast. Stamping polish dries in seconds and stops transferring.
Best For: Beginners with short to medium nails. Perfect for cozy nights and gift swaps.
Make It Last: Let the stamp dry for one minute. Float the top coat over it without dragging.
Frequently Asked Questions
What are frosted snowflake winter nails?
Frosted snowflake winter nails combine an icy finish with small snowflake designs. The frost comes from milky bases, chrome powder, pearl shimmer or fine glitter. The snowflakes appear as hand-painted lines, stamped images, stickers or 3D charms. You can keep the look subtle on one accent nail or cover every finger.
Can you wear snowflake nail designs on short nails?
Yes. Short nails suit tiny snowflakes, negative space linework and micro French tips. Keep each snowflake small, so it fits the nail bed without crowding. Use thin lines and a sheer base. Choose one or two accent nails if your nail bed is narrow. Short nails also chip less during busy winter weeks.
What colors go best with snowflake nail designs?
White snowflakes look sharp on navy, cranberry, deep green and black. Soft looks pair silver or white snowflakes with milky white, icy blue or sheer nude. Choose a cool-toned base for a frosty feel. Pick a warm red or berry for holiday contrast. Your skin tone decides which shade glows brightest.
How do you draw a snowflake on your nails?
Use a thin liner brush and a tiny drop of white gel or polish. Draw a plus sign first. Add a diagonal cross over it to create six arms. Finish each arm with two small angled strokes. Add a dot in the center. Cure the gel or let the polish dry, then seal with top coat.
How long do frosted snowflake nails last?
Gel versions often last two to three weeks with good prep and a capped free edge. Regular polish lasts about five to seven days. Builder gel and acrylic sets can last three to four weeks with fills. Wear gloves for dishes and cold-weather chores. Daily cuticle oil helps your nails stay flexible and resist chips.
Your Frosted Nail Moment Starts Now
Frosted snowflake winter nails give you sparkle, softness and a little holiday magic. Choose the design that fits your nail length, your schedule and your skill level. Start small if you feel nervous. Try one snowflake on your ring finger. Add chrome, charms or glitter once you love the look. Your nails do not need to be perfect. They only need to make you smile when you reach for your coffee. Save this post to your Pinterest board, then show your favorite design to your nail tech. Which snowflake look will you try first?